I ran across this video of Will making cookies over Christmas and had to post it.

Thursday, January 28, 2010
Monday, January 25, 2010
Craft time - Touch and feel wall
My sister had a great idea to duplicate one of the features in the Children's Museum in New Orleans. Lynn, who is not always so crafty, recruited me to help turn her idea into a reality. So, this weekend I drove down to the compound and helped assemble a touch and feel wall for my niece's room.
Step 1: Have a cute and adorable subject to build a touch and feel wall.
 Step 2: By my retired, first grade teacher mother's suggestion, we drew and cut out patterns for the petals. And when I say we, I mean me.

Step 3: Lay out patterns on styrofoam board to make sure they all fit, and then trace. Lynn started at one end, I started at the other. Took all of 5 minutes.


Step 4: Cut out petals with an exacto knife or, like me, a large bread knife. I recommend doing this outside. It makes a mess. I did think of this before cutting, and didn't leave a snowy mess in my mother's living room.
Step 1: Have a cute and adorable subject to build a touch and feel wall.
 Step 2: By my retired, first grade teacher mother's suggestion, we drew and cut out patterns for the petals. And when I say we, I mean me.
Step 3: Lay out patterns on styrofoam board to make sure they all fit, and then trace. Lynn started at one end, I started at the other. Took all of 5 minutes.


Step 4: Cut out petals with an exacto knife or, like me, a large bread knife. I recommend doing this outside. It makes a mess. I did think of this before cutting, and didn't leave a snowy mess in my mother's living room.
 Step 5: Cut pieces of textured fabric and glue onto petals. We purchased different kinds of felt, cheneille, and linen fabric. Lynn also had some fabric scraps that we used. Also, we used a spray adhesive for the flat part of the petal, and hot glued the edges. Note to self, be careful with the hot glue gun. The sister burned her fingers a few times. Oh, and if you are not careful, the hot glue will melt the styrofoam.
 Steps 6-9 (which I didn't take pictures of) - We glued then taped 2 yards of fabric on a 3 foot tall by 4 foot wide piece of plywood. Next, we hot glued the petals in a flower shape. For the center, we used plastic furniture sliders. (Another great idea by my mother.) We purchased two 8 1/2 x 11 peel and stick felt sheets for the stems and leaves.
Below is the end product. Pretty cute, huh? They are going to drill this into a wall in Maggie's room for her to...touch and feel. (Go figure?) Seriously, though, its a great "toy" to have in a baby's room as she is learning to use her sense of touch. And, it is something that will hopefully last as she grows into a toddler. All, in all, I believe the materials cost around $30. Though, we did find some items (like the plywood) around the house, which made it a cheaper project. I think it turned out pretty cute, and it was one of the neatest kid ideas the sister has ever had!!!
Oreo truffles
Thanks, Deva, for this recipe and for introducing me to these lovely candies. These are a great party treat, and I have even given them away before in tins as a little gift. For a different take on this recipe, visit KJ's blog.
Ingredients:1 (16 ounce) package OREO cookies
1 (8 ounce) package cream cheese, softened
1 to 2 (8 ounce) packages BAKER'S Semi-Sweet Baking Chocolate, melted
Directions:
Crush cookies into crumbs; place in medium bowl. Cookies can be finely crushed in a resealable plastic bag using a rolling pin or food processor. Personally, I recommend the rolling pin. Especially if you have had a stressful day! : )
 Add cream cheese; mix until well blended.
Roll into small balls. If needed, place in freezer to harden for about 15-30 minutes. Best part about the rolling is licking your hands after!
 Slowly melt chocolate in a double boiler. I created my own by using a small pot and skillet. Bring the water to a slow boil, and then place your chocolate in the skillet. Then turn the burner down to medium low so it remains a simmer. If you continue with a hard boil, the chocolate will burn.
 Dip balls in chocolate; place on wax paper-covered baking sheet to dry. You don't want to leave the balls in the hot chocolate for too long because they will start to melt. I roll them around with a fork, lift out, and place on wax paper. Also, during the process the balls waiting to be coated started getting soft. I had to stop, put them in the freezer for a few minutes, and resume dipping. In order not to waste any of the already melted chocolate, I dipped pretzles, peanut butter cookies, and nuts while I was waiting for the oreo balls to re-harden.
 To add a little style and flavor to the truffles, I sprinkled some chopped pecans and crushed graham crakers on top. It added a little color and texture. Other good toppings would be chopped white chocolate, sprinkles, crushed cookies, marshmallows, or anything your heart (or sweet tooth) desires!
 Refrigerate until firm, about 1 hour. Store leftover truffles, covered, in refrigerator.
Pumpkin Greatness!
For those that know me well, you know that:
1. I LOOOOOOVE cookies! They are a major weakness, and I try not to keep them around the house because I would eat tons of them every day. And...
2. I love pumpkin! I love pumpkin pie, I love pumpkin ice cream, I love pumpkin muffins, pumpkin coffee, pumpkin cheesecake, and pretty much pumpkin anything!
So...in light of these two loves, I made soft-baked pumpkin cookies for the first time over Christmas. Ummm....they were kinda fantastic. You should make them yourself....
Ingredients:
2 1/2 cups all-purpose flour
1 teaspoon baking soda
1 teaspoon baking powder
1 teaspoon ground cinnamon
1/2 teaspoon ground nutmeg
1/2 teaspoon salt
1 1/2 cups granulated sugar
1/2 cup butter (1 stick), softened
1 cup pure pumpkin
1 large egg
1 teaspoon vanilla extract
Glaze (recipe follows)
Directions
PREHEAT oven to 350° F. Grease baking sheets. COMBINE flour, baking soda, baking powder, cinnamon, nutmeg and salt in medium bowl. Beat sugar and butter in large mixer bowl until well blended. Beat in pumpkin, egg and vanilla extract until smooth. Gradually beat in flour mixture.
Drop by rounded tablespoon onto prepared baking sheets. BAKE for 15 to 18 minutes or until edges are firm. Cool on baking sheets for 2 minutes; remove to wire racks to cool completely.
Drizzle Glaze over cookies.
FOR GLAZE:COMBINE 2 cups sifted powdered sugar, 3 tablespoons milk, 1 tablespoon melted butter and 1 teaspoon vanilla extract in small bowl until smooth.
A bit of a girl-crush...
Thanks to a tip from my friend Carol, several months ago I stumbled upon The Pioneer Woman. She's amazing. She's good at everything. Photography, writing, ranching, and most of all, cooking. Her blog, is fantastic. And when I say fantastic, I really, really mean fantastic! And she's funny and seems nice, and I just like her...even if I have never met her.
So, for a pre-Christmas gift from work, I received a giftcard to Barnes and Noble. I used part of it to buy some supplies for my co-wokers. (Everyone needs a new AP Stylebook.) And with part of the remaining money, I bought the Pioneer Woman's cooking book. AMAZING! Great, simple recipes, beautiful pictures, and step-by-step instructions.
The first recipe I tried was the flat apple pie. I tested it on my family, and, of course, they loved it! Its basically the same ingredients as a regular apple pie, but instead of baking it in a pie dish with a top and bottom layer, you bake it on a cookie sheet with an oversized bottom crust that folds over the top. Its a rather rustic looking and pretty pie. And like I said, the family loved it!!!
I recommend checking out the cookbook sometime. Its a great addition to any cook's library, and I plan on making quite good use of it! And if you want to follow the Pioneer Woman, you can find her at
http://thepioneerwoman.com/
http://twitter.com/thepioneerwoman
Christmas Flashback
So...I am a major slacker when it comes to blogging. But...I've been busy, and the computer situation at home is a bit sticky. Blah, blah, blah.
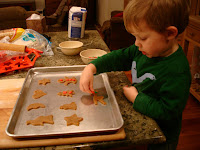
Christmas is always a lot of fun for me and the family because not only do we not have to work/go to school, we get to spend lots of time at home in the kitchen. This year Will was old enough to participate in a few activities, so I found a cute cooking project on the Pillsbury Web site to do with him.
Ingredients:
*Pre-made gingerbread or sugar cookie dough
Red & green M&M's
mini-pretzels
* You can make your own cookie dough, but store bought was way easy!
Directions:
1. Dust pastry sheet or cutting board with flour. Roll out cookie dough in a retangular shape.
 2. Slice cookie dough in triangles to form reindeer heads.
3. Place pretzles on two corners for ears.
 4. Place 2 green M&M's for eyes and one red M&M's for a nose.
 5. Bake according to directions on cookie pack. Usually at 350 degrees for about 11 minutes.
Will had a great time making cookies with Aunt Sheri. And Aunt Sheri had a great time in the kitchen with her favorite nephew. All in all, it was a great Christmas project with the family.

PS - Not telling you which tray I decorated and which one Will did! : )
Sunday, January 24, 2010
Friday, January 8, 2010
Where, oh where, has this little blogger gone...
Oh where, oh where can she be?
Truthfully, I have been on sabbatical. Okay, not really. Maybe mentally. Well, at least mentally for two or three weeks. So where I have really been?
Between the last post and December 18th I was extremely busy and/or extremely sick. Trying to wrap up the fall semester and catching stomach virus and bad cold. Trust me...the stomach virus will put a halt on any cooking and/or blogging about cooking.
After December 18th I started Christmas break. Lots of shopping, lots of baking, cleaning, watching movies, chasing the nephew, cuddling the niece...Two solid weeks of R&R for this weary PR gal.
Then, I've been back at work at least physically, but not so much mentally, for the last 5 days. (Okay, we had a snow day yesterday and I watched 3 movies with a friend. But I did work 4 days this week.)
Needless to say, I haven't just been sitting on my butt the last month. Okay, so some of the time I was sitting on my butt. But I really haven't been not cooking. In fact, I've been cooking quite a bit! I've made:
1. Flat apple pie from The Pioneer Woman's cookbook
2. Reindeer gingerbread cookies with my nephew
3. My vegetable soup
4. Pumpkin cookies
5. Chocolate banana empanadas (Which I don't think turned out that great, but my family swore they liked them. Maybe they were just being nice.)
6. Oreo balls
and probably more....
I will blog the essentials, along with pictures of some of our baking activities. I have to say, my nephew is quite the cook. He loves helping Aunt Sheri and Nana in the kitchen, and I love sharing one of my passions with him.
So, for now, I leave you with a non-foodie update on why I haven't blogged. Hopefully I will get a few of the recipes/adventures up this weekend.
Happy cooking!
Subscribe to:
Posts (Atom)